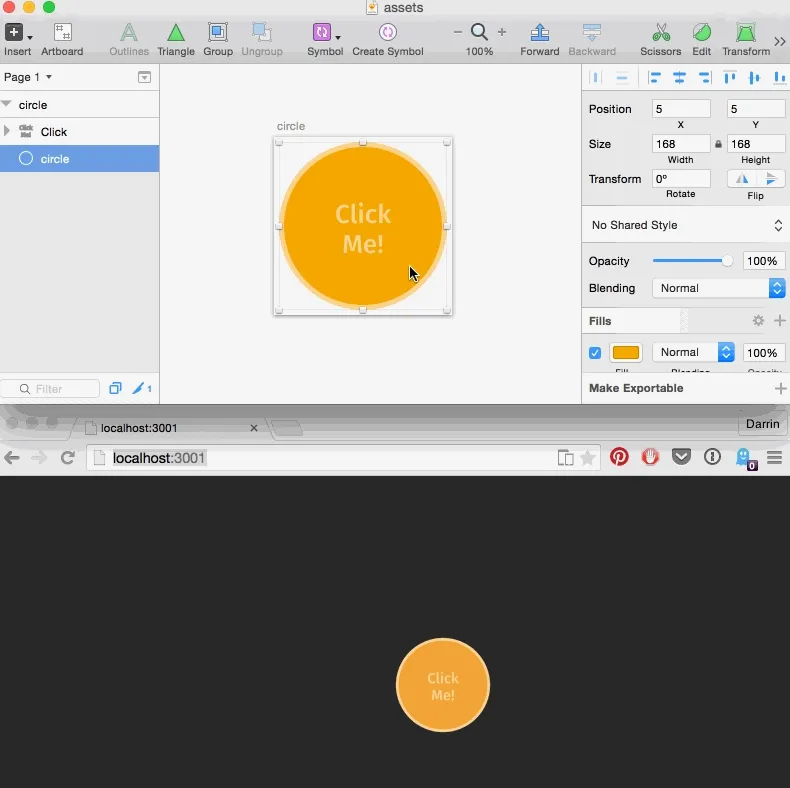
When I save my Sketch file, my Framer.js prototype updates and reloads instantly.
Rationale
The process of design is often thought of as being entirely generative-people who design things study a particular problem, pull out their sketchbooks, markers and laptops, and produce artifacts which slowly but surely progress towards some end result which then becomes “The Design” of “The Thing”. It is seen as an additive process, whereby each step builds upon the previous, sometimes with changes or modifications which solve issues brought to light by the earlier work.
Early in my career, I would sit at my desk and look with disdain at all the crumpled-paper that filled my trash bin and cherish that one special solution that made the cut. The bin was filled with all of my “bad ideas”. It was overflowing with “failed” attempts before I finally “got it right”. It took me some time, but I’ve slowly learned that the core of my design work is defined not by that shiny mockup or design spec I deliver, but more truly by the myriad of sketches and ideas that got me there. If your waste bin isn’t full by the end of a project, you may want to ask yourself if you’ve spent enough time exploring the solution space.
I really love how Facebook’s Product Design Director Julie Zhuo put it in her essay “Junior Designers vs. Senior Designers”, where she illustrates (in a very non-scientific, but effective way) the difference in process that experience begets. The key delta to me is the singularity of the Junior Designer’s process, compared to the exploratory, branching, subtractive process of the more seasoned designer. Note all the dead ends and occasions where the senior designer just abandons an idea or concept. They clearly have a full trash bin by the end of this journey. Through the process of evaluation and subtraction, a final result is reached. The breadth of ideas explored and abandoned is what defines the process, rather than the evolution of a single idea. It is important to achieve this breadth of ideation to ensure that the solution you commit to was not just a lucky one, but a solution that was vetted against a variety of alternatives.
The unfortunate part of this realization is that often it is just that - an idealized process which faces little conceptual opposition but (in my experience) is often sacrificed in the name of speed or deadlines. Generating multiple sketches is not a huge cost, and is one of the primary reasons so much exploration should take place at that fidelity. Interactions, behavioural design and animations, however, are much more costly to generate, and so the temptation there is to iterate on an idea until it feels right. While this is not inherently a bad thing, wouldn’t it be nice if we could iterate and explore things like animations with the same efficiency we experience with sketching?
As a designer with the ability to write some code, my first goal with any project is to eliminate any inefficiencies - let me focus on the design and not waste time elsewhere. I’m going to walk through a framework I’ve developed during a recent project, but the principle is universal - eliminate or automate the things you can, and maximize the time you spend actually problem-solving and designing.
Designing an Animation Using Framer.js and Sketch
Get the boilerplate on GithubUser experience design has become a much more complex field as hardware and software have evolved to allow increasingly fluid, animated, and dynamic interfaces. When designing native applications (especially on mobile platforms such as Android or iOS) there is both an expectation and great value to leverage animation in our UI. Whether to bring attention to an element, educate the user about the hierarchy of the screens in an app, or just to add a moment of delight, animation can be a powerful tool when used correctly. As designers, we must now look beyond Photoshop and static PNG files to define our products, and leverage tools like Keynote or HTML to articulate how these interfaces should behave.
My current tool of choice is a library called framer.js, which is an open-source framework for prototyping UI. For visual design I use Sketch. I’m going to show you how I combine these two tools to provide me with a fast, automated, and iterative process for designing animations.
I am also aware that Framer Studio exists, as well as Framer Generator. These are both amazing tools. However, I am looking for something as automated and low-friction as possible; both of these tools require some steps between modifying the design and seeing the results. Lets look at how I achieved a fully automated solution to this problem.
Automating Everything With Gulp
Here is the goal: let me work in my Sketch and/or CoffeeScript file, and just by saving, update my animated prototype with the new code and images without me having to do anything. Lofty, I know, but let’s see how it’s done.
Gulp is a Javascript-based build tool, the latest in a series of incredible node-powered command line build tools.
The gulpfile is just a list of tasks, or commands, that we can run in different orders or timings. Let’s breakdown my gulpfile.js:
var gulp        = require('gulp');
var coffee      = require('gulp-coffee');
var gutil       = require('gulp-util');
var watch       = require('gulp-watch');
var sketch      = require('gulp-sketch');
var browserSync = require('browser-sync');
This section at the top just requires (imports) the external libraries I’m going to use. These include Gulp itself, CoffeeScript support (which for me is faster than writing Javascript), a watch utility to run code whenever a file changes, and a plugin which lets me parse and export from Sketch files.
gulp.task('build', ['copy', 'coffee', 'sketch']);

gulp.task('default', ['build', 'watch']);
Next, I setup the tasks I’d like to be able to run. Notice that the build and default tasks are just sets of other tasks. This lets me maintain a separation of concern and have tasks that do only one thing.
gulp.task('watch', function(){

  gulp.watch('./src/*.coffee', ['coffee']);

  gulp.watch('./src/*.sketch', ['sketch']);

  browserSync({
    server: {
      baseDir: 'build'
    },
    browser: 'google chrome',
    injectChanges: false,
    files: ['build/**/*.*'],
    notify: false
  });
});
This is the watch task. I tell Gulp to watch my src folder for CoffeeScript files and Sketch files; these are the only source files that define my prototype and will be the ones I change often. When a CoffeeScript or Sketch file changes, the coffee or sketch tasks are run, respectively.
Next, I set up browserSync to push any changed files within the build directory to my browser, which in this case is Chrome. This keeps my prototype in the browser up-to-date without having to hit refresh. Notice I’m also specifying a server: key, which essentially spins up a web server with the files in my build directory.
gulp.task('coffee', function(){
  gulp.src('src/*.coffee')
    .pipe(coffee({bare: true}).on('error', gutil.log))
    .pipe(gulp.dest('build/'))
});
The second major task is coffee. This, as you may have guessed, simply transcompiles any *.coffee files in my src folder to Javascript, and places the resulting JS file in my build folder. Because we are containing our prototype in one app.coffee file, there is no need for concatenation or minification.
gulp.task('sketch', function(){

  gulp.src('src/*.sketch')
    .pipe(sketch({
      export: 'slices',
      format: 'png',
      saveForWeb: true,
      scales: 1.0,
      trimmed: false
    }))
    .pipe(gulp.dest('build/images'))
});
The sketch task is also aptly named, as it is responsible for exporting the slices I have defined in my Sketch file to pngs, which can then be used in the prototype. In Sketch, you can mark a layer or group as “exportable”, and this task only looks for those assets.
gulp.task('copy', function(){
  gulp.src('src/index.html')
    .pipe(gulp.dest('build'))
    gulp.src('src/lib/**/*.*')
    .pipe(gulp.dest('build/lib'))
    gulp.src('src/images/**/*.{png, jpg, svg}')
    .pipe(gulp.dest('build/images'));
});
The last task is simply housekeeping. It is only run once, when you first start the Gulp process on the command line. It copies any HTML files, JS libraries, or other images I want available to my prototype. This let’s me keep everything in my src folder, which is a best practice. As a general rule of thumb for build systems, avoid placing anything in your output directory (in this case, build), as you jeopardize your ability to have repeatable builds.
Recall my default task was defined above, as:
gulp.task('default', ['build', 'watch']);This means that by running $ gulp in this directory from the command line, my default task is kicked off. It won’t exit without ctrl-C, as watch will run indefinitely. This lets me run this command only once, and get to work.
$ gulpSo where are we now? If everything worked, you should see your prototype available at http://localhost:3000. Saving either app.coffee or app.sketch should trigger the watch we setup, and compile the appropriate assets to our build directory. This change of files in the build directory should trigger BrowserSync, which will then update our prototype in the browser. Voila! We can now work in either of 2 files (app.coffee or app.sketch), and just by saving them have our shareable, web-based prototype updated in place. And the best part is, I only had to set this up once! I can now use this framework with my next project and immediately begin designing, with a hyper-fast iteration loop to facilitate that work.
The next step is to actually design the animation using Sketch and framer.js, which deserves it’s own post altogether and will be covered in Part Two of this series.
Follow me on twitter @darrinhenein to be notified when part two is available.